
Pipeline
FOMENO breaks the work of bringing intangible heritage into XR into a series of clear, repeatable steps. Each step has a defined purpose, and for each one there are different tools you can use depending on your material and your target platform.
The pipeline moves through three phases: building the character, giving it movement, and bringing it into XR. For each step below, we explain what we did, flag what to watch out for, list the tools we used, and note alternatives where they exist.
This list isn't fixed. If you know of a tool that fits a step, you can suggest it through the Contribute page.
A note on working with the experts
Keep a close connection with the archaeologists, historians and practitioners. With every step communicate the results and get feedback for accuracy as you go rather than leaving this to the end. The pipeline is built to be flexible, so depending on the feedback you can go back and repeat a step.
Character
Use references to create characters that can be animated.
-
Step 1 Generate the character
This step produces the character as 2D images, which later steps turn into a rigged 3D model. The starting point can be scientific papers describing how people looked in a given place and period, combined with stories, written records, or artefacts carrying a depiction. Those sources are used to generate the images with AI. What comes back is a first pass rather than the output of the step: experts on the material read the images, and what they correct goes back into the prompt for multiple rounds.
What we did
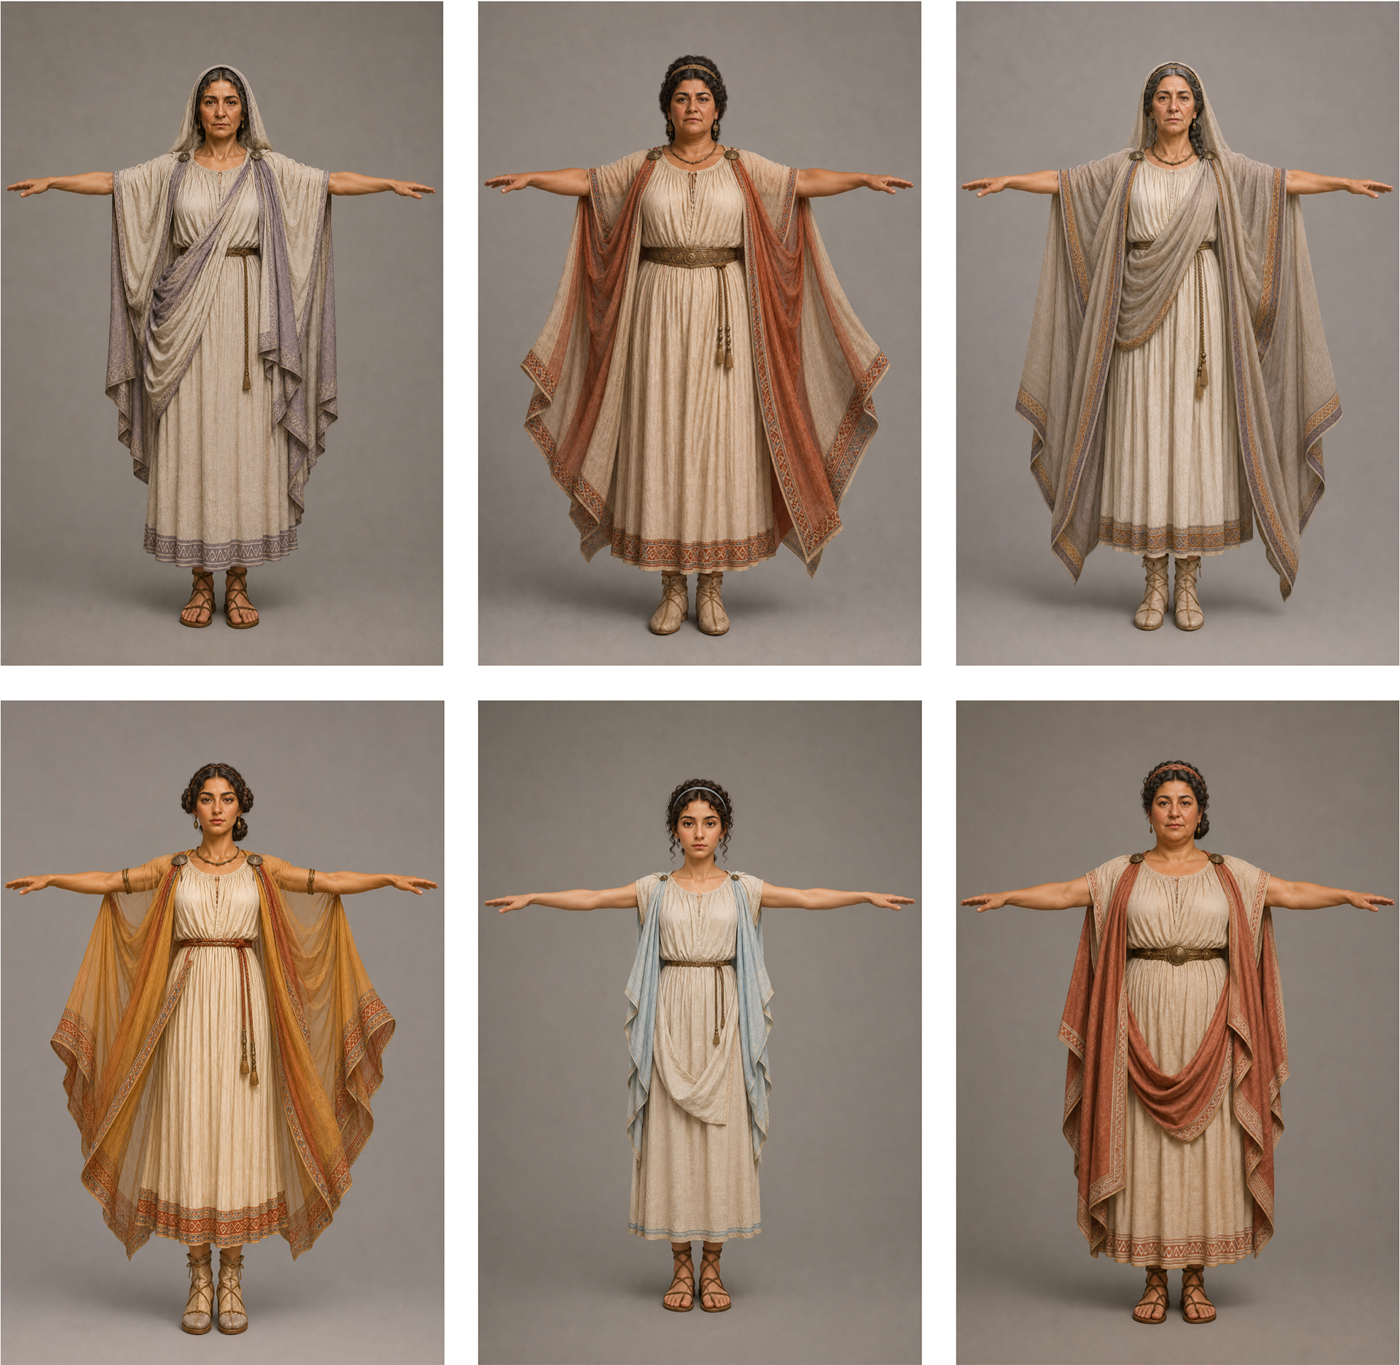
Our sources were publications on how the figures looked at the site and period (source documents). We gathered them into Google NotebookLM and asked it to pull the relevant detail and write a prompt for an image generator, rather than describing the character ourselves. We also told it what the images were for: because the character had to be rigged later, we needed a neutral T-pose, and the prompt had to account for that. We then generated the images from that prompt in ChatGPT.
That first round was a starting point, not a result. We took the images to the excavation team at Sagalassos and went through them together. Their corrections were mostly in the detail the generator had filled in for itself: the accessories, the colours of the clothing and the hair, and how the garments were worn, including whether the figure should be veiled. That went back into the prompt and we generated a second round, which was far closer to the sources. Those are the images the rest of the pipeline was built on.
 (view full size)
The first round, generated from the source documents alone. 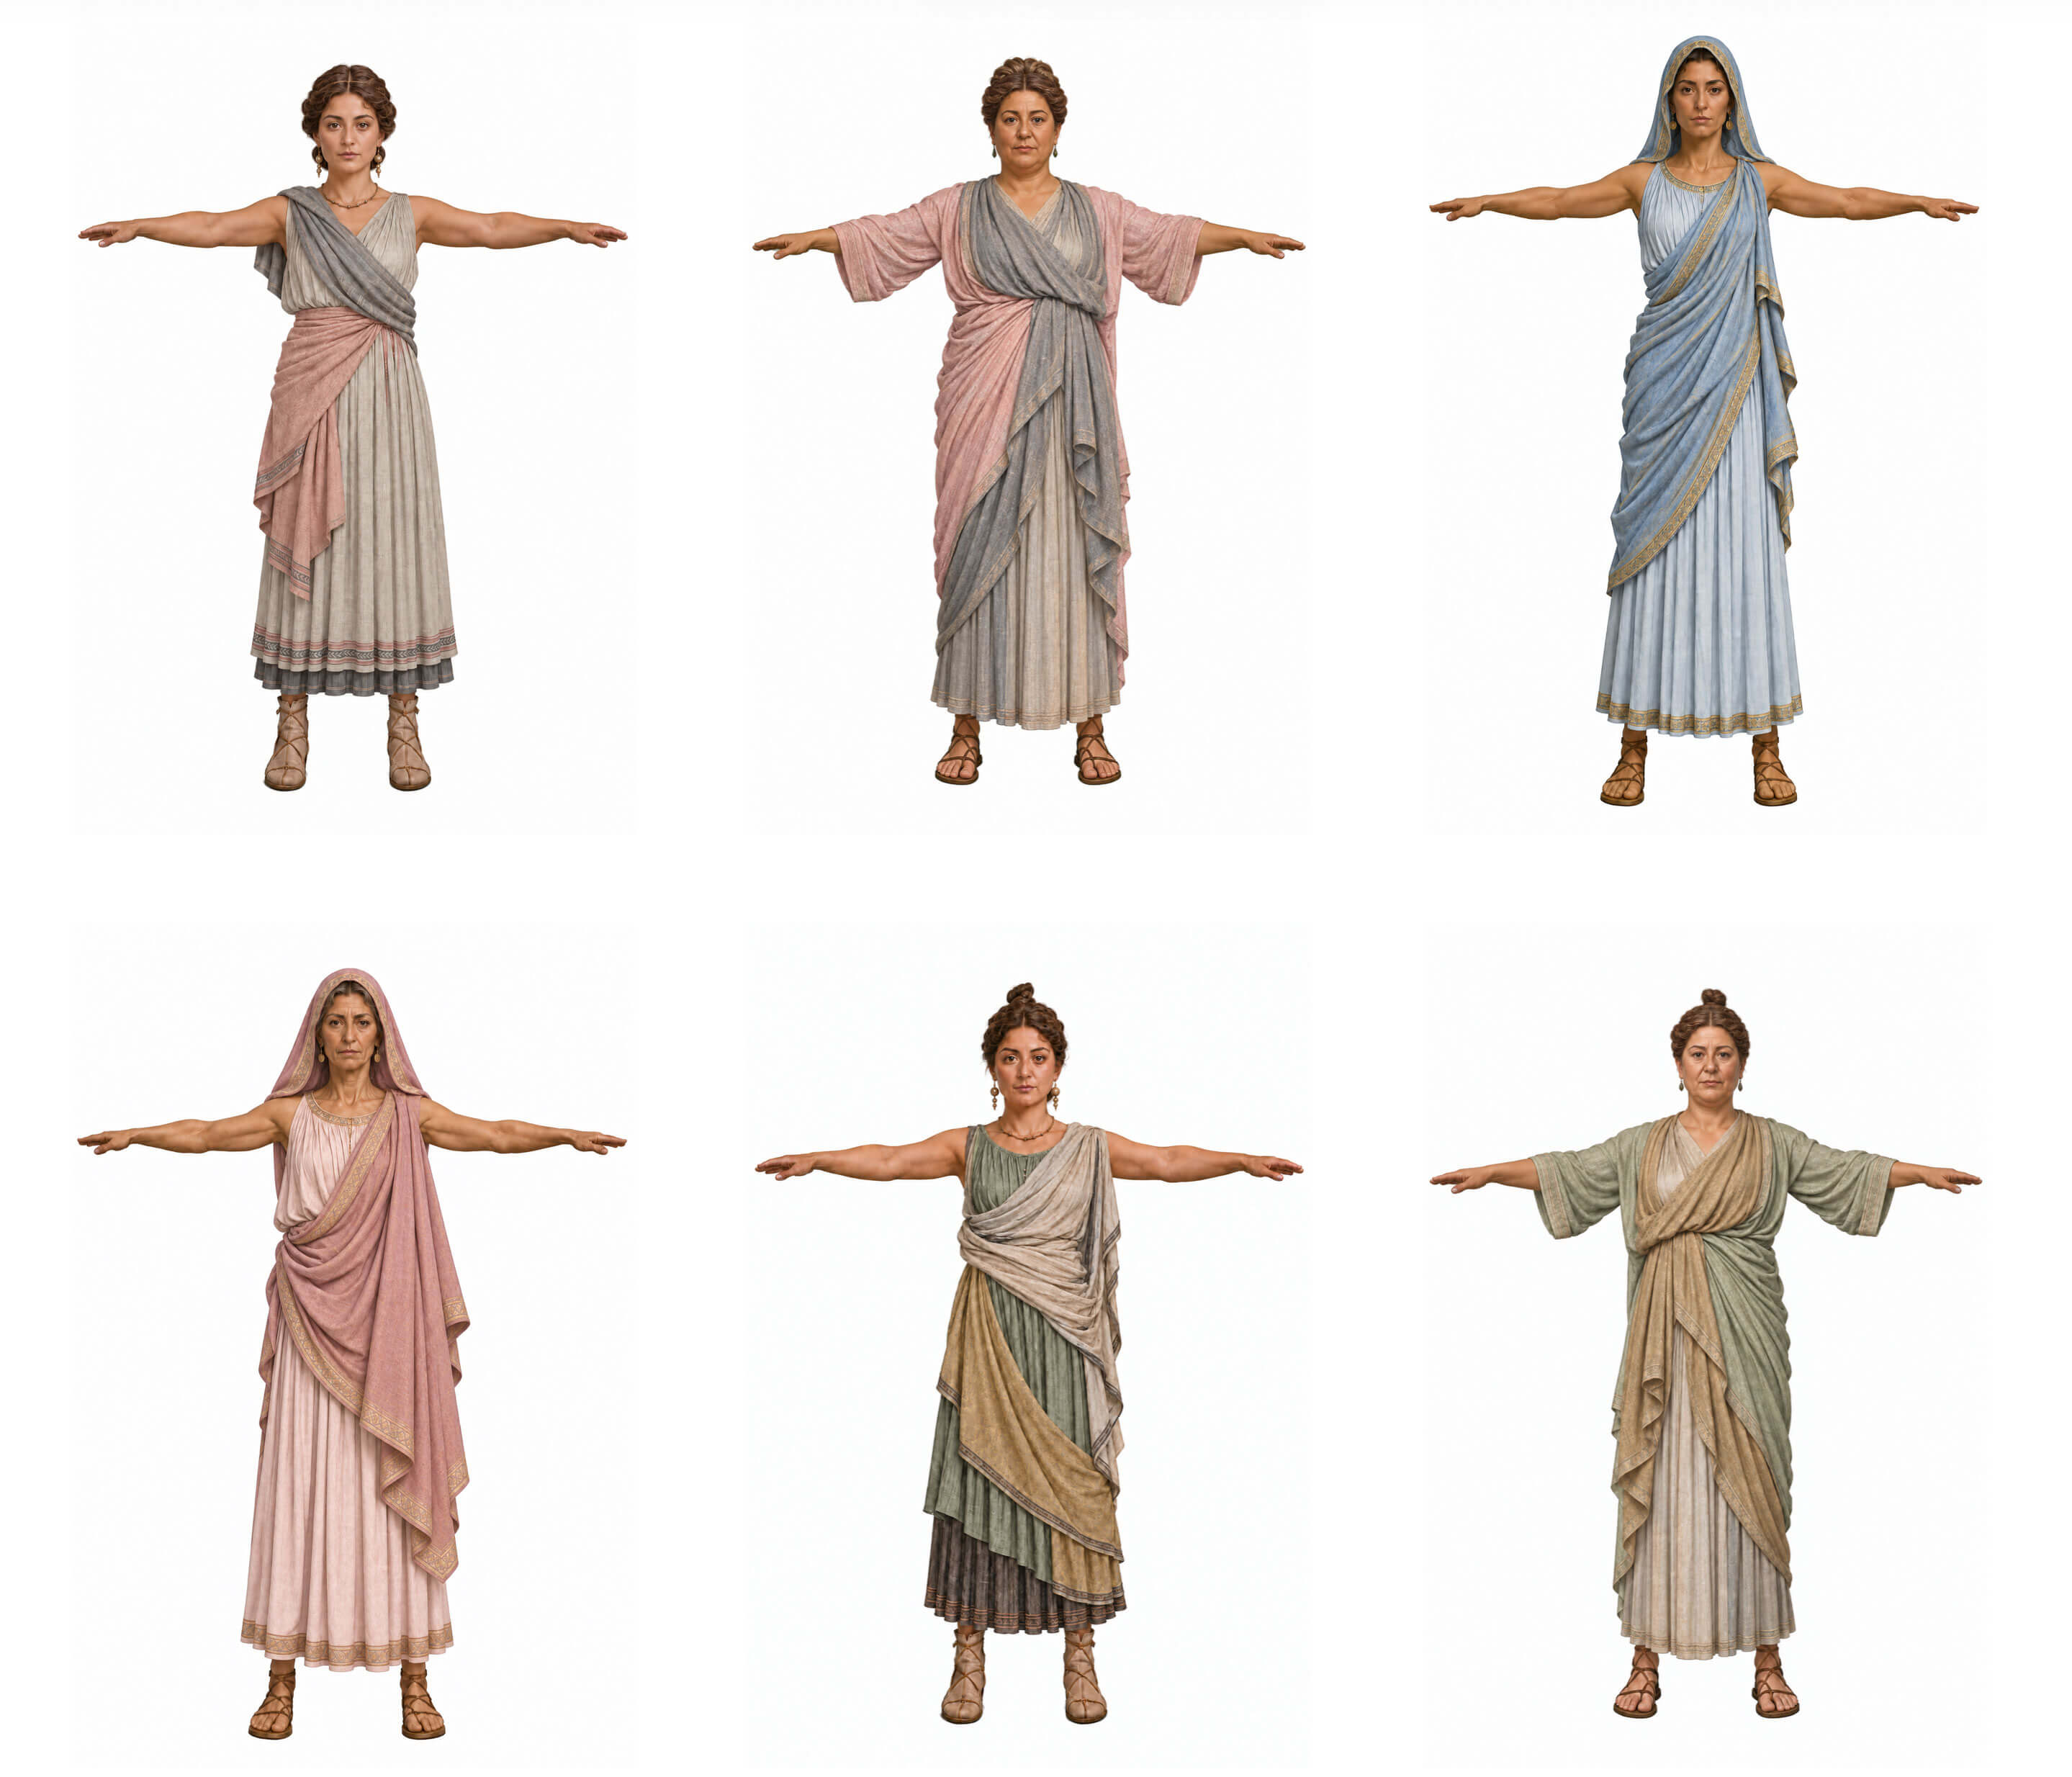 (view full size)
The second round, after the excavation team's corrections. These are the images the rest of the pipeline used. Watch out for
State in the prompt that the result must rely only on the documented detail, with no stereotypes and no stylised game characters. If you don't, AI might drift that direction. More importantly, share the first results with the experts and generate again incorporating their feedback.
One more constraint arrives from further down the pipeline. Auto-riggers work out their weights partly from how symmetric a figure is, so an asymmetric body gives a rig that deforms badly once it moves. Make symmetry a hard rule in the prompt, alongside the neutral pose.
Tools
This area moves fast and new tools appear constantly, so it is worth checking what is available before you start. The tools below are grouped by the two jobs this step involves. A single tool may eventually handle both at once.
Information gathering
-
Google NotebookLM We used this
Reads the source documents and writes the image-generation prompt.
-
Another option for reading the sources and drafting the prompt.
Image generation
-
ChatGPT We used this
Generates the character images from the prompt.
-
Alternative image generator.
-
Seedream (ByteDance)
Alternative image generator.
Know another tool for this step? Suggest a tool for step 1: Generate the character
-
-
Step 2 Build an animatable 3D model
This step turns the generated T-pose images into a rigged 3D model, ready to be animated. It is a sequence of separate jobs rather than one: building the mesh, reducing it to something a real-time engine can carry, separating the costume into parts where it has to move on its own, texturing, and rigging.
What we did
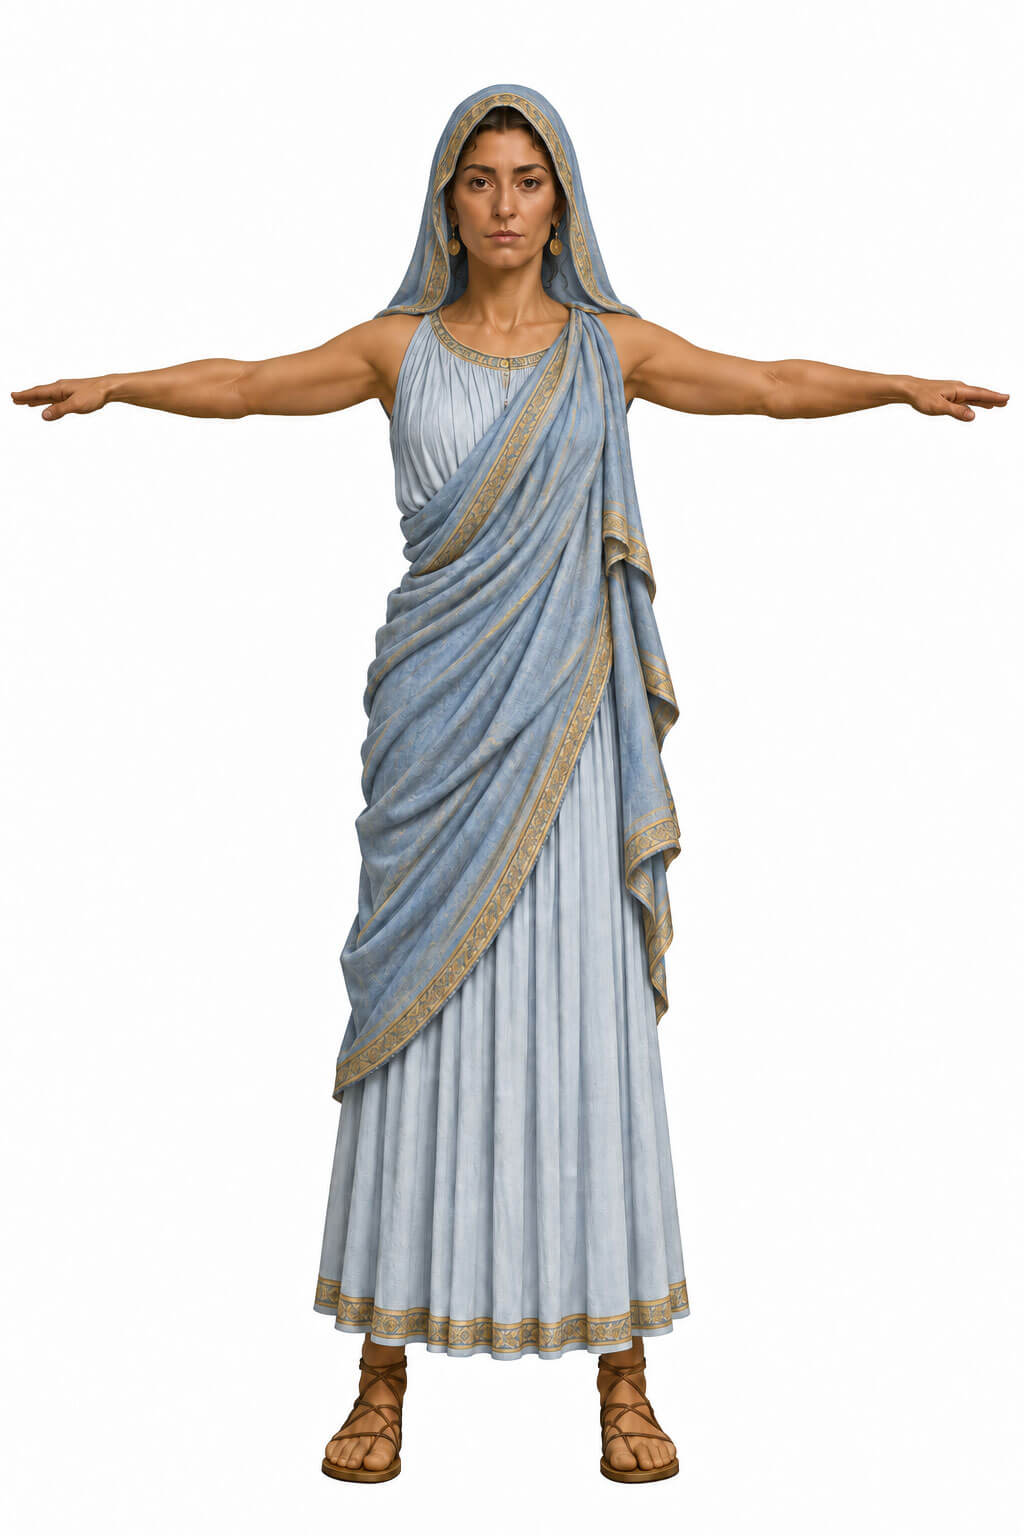
Rather than modelling each character by hand from the reference sheet, we generated the model from the 2D T-pose images. We began in Meshy.ai but could not get a usable rig out of it, so we moved to Tripo3D for the model and for separating the costume into parts, and rigged it in AccuRig.
 (view full size)
The finished model, rigged and in its T-pose. Watch out for
The order of these jobs matters: build the mesh, reduce it, separate the costume into parts, texture, then rig. Some tools expect a different order, so check which one yours wants before you start.
The models coming from the AI tools are not always cleanly rigged, and they are rarely optimised for a specific XR medium out of the box. Depending on the medium you are targeting, it is possible a 3D artist needs to fine-tune them.
Tools
This area moves fast and new tools appear constantly, so it is worth checking what is available before you start.
-
Image-to-3D with rigging built in. Its denser models can resist rigging, and reducing the mesh first costs quality.
-
Tripo AI We used this
Image-to-3D with retopology and part segmentation. Mesh, reduce, segment, texture, then rig: the order is not interchangeable.
-
AccuRig (Reallusion) We used this
Free auto-rigger, for rigging a model some other tool built. Exports straight to iClone. Wants a symmetric figure.
Know another tool for this step? Suggest a tool for step 2: Build an animatable 3D model
-
Movement
Movement is captured from a performance and transferred onto the character.
-
Step 3 Source the movement
This step produces the footage the movement will be read from. It can be existing video containing the motion the character is to perform, or, where the heritage is still alive or the practice is being re-enacted, a recording made of the performance itself.
What we did
We did not stage a shoot ourselves. We were fortunate to find Ninfe Nereidi Danze Antiche, a dance company already performing dances similar to the ones we wanted to capture, and with their permission we used some of their footage. That meant the movement came from people who perform it, rather than from a description of it.
That footage was filmed as a performance, though, not for a machine to read, so it did not go into the capture step as it was. We used it as the reference for AI video generation and generated our own video from it, closer to what the capture step needs: one dancer at a time, the full body in frame throughout, and the clothing clearly distinguishable from the background. That generated video is what the motion was captured from.
Within the scope of this prototype we worked from the company's public videos alone. Their repertoire is close to what may have been danced at Sagalassos, which was what a prototype needed, while the steps and the choreography themselves are still to be researched. What you see is a dance of the right kind, rather than a reconstruction of one particular dance.
Ninfe Nereidi have offered to look into the dance at Sagalassos in more depth and to record a performance made for motion capture. That goes beyond this prototype, and it is where we would take the work next.
The company's footage, which we used as the reference for the video we generated. The video we generated from it, which the motion was captured from. Watch out for
Copyright
Whenever the source material comes from someone else, whether that is the people performing or existing footage of them, get their permission before using it.
Video details
The next step pulls the movement out of this video with AI and transfers it onto the 3D character, so the footage has to be readable by a machine, not just by a person:
- Show the full body.
- Make sure the movement you want to capture is clearly visible.
- Keep the colour of clothing and background distinguishable so the motion stands out. This matters most for generated video, but helps in every case.
- If the heritage involves several people, film them one at a time where you can. A crowded scene makes it hard for the tool to isolate the movement you are after.
- Use the highest resolution you can. Capture tools read limbs out of fine detail, and at low resolution the hands and fingers are the first thing they get wrong.
Tools and techniques
Use existing footage
-
Existing performance footage We used this
Find a group or archive already performing the practice and use their footage, with permission.
Generate the video with AI
-
AI video generation We used this
Generate the movement as reference video from a description or references. There are many AI video models and they differ in what movement they handle well, so use whichever fits the movement you are after.
Film your own shoot
The one route that puts you at the performance, which also opens the second option in the next step: recording the motion there and then, rather than reading it back out of the video afterwards.
-
Staged shoot with actors
Use the reference documents, stories or depictions to direct actors performing the practice, and film it.
Know another tool for this step? Suggest a tool for step 3: Source the movement
-
Step 4 Capture the motion
This step turns the movement into animation data the 3D model can perform. AI motion-capture tools read it out of the source video; if you are filming the practice yourself, you can also record it at the performance instead.
What we did
We fed the source video from the previous step into iClone's Video Mocap add-on, which reads the movement out of the video and outputs it as motion data.
The source footage set up in iClone's Video Mocap, ready for full-body detection. The captured motion data played back on a plain figure, in front of the source video it came from. Watch out for
Good source footage makes this step far easier, and most of the quality really is set upstream. It does not make the step automatic. Capture tools cap how long a single clip can be, so a performance of any length has to be split, captured in pieces and rejoined in time with the rhythm. Each piece comes back with its own root position and rotation, so at every join the character slides or snaps until you line the pieces up by hand. Budget for the reassembly, not just the capture.
Tools and techniques
This area moves fast and new tools appear constantly, so it is worth checking what is available before you start.
Read the motion out of video
Works on footage you did not shoot, which is what makes it the route for existing performances and archive material.
-
iClone Video Mocap (Reallusion) We used this
Reads the movement out of ordinary video and outputs it as motion data, with no suit or markers. It is an add-on for iClone, so the capture happens inside that software and you need it too.
Record the motion at the performance
Only open to you if you are filming the practice yourself.
-
Mocap suit
The performer wears a suit of inertial or optical markers and the movement is recorded as data directly, so nothing has to be inferred from a picture. The cleanest data of the three, and the most intrusive to ask of a performance.
-
Depth camera
A depth-sensing camera records the body in three dimensions, which removes the guesswork a flat video leaves about how far each limb is from the lens. Less setup than a suit, and it leaves the performer unencumbered.
Know another tool for this step? Suggest a tool for step 4: Capture the motion
-
-
Step 5 Apply the motion to the model
The captured animation is applied to the 3D model, bringing the character to life.
The right approach depends on the platform you will publish to, which is decided in the following steps. It helps to know your target medium before you start, since it determines whether you merge inside the platform or prepare a finished animated model to import.
This step is where the pipeline branches by platform. The material from the earlier steps, the rigged model and the animation data, stays reusable. If you decide to target a different platform later, you come back to this step and produce it for that platform, without redoing any of the earlier work.
What we did
We used Unity as our distribution platform, so we combined the animation data and the rigged 3D model directly in Unity.
The character performing the captured movement, beside the footage it was taken from. Tools and techniques
There are two ways to bring the animation data and the rigged model together.
Merge in the XR platform
Most 3D platforms for XR production can combine the animation data and the rigged model directly. Use this route when you build in the same platform you will publish to.
-
Unity We used this
We combined the animation data and the rigged model here, since it was our distribution platform.
-
Web-based AR, now a free open-source toolset.
-
Web-based AR, another browser option.
Merge in 3D software, then import
Combine the model and the animation in 3D software to produce a finished animated character, then import it into the platform you have chosen.
-
Produces an animated character to import into your platform.
Know another tool for this step? Suggest a tool for step 5: Apply the motion to the model
-
XR
The character is placed in a scene built for the platform your audience will use.
-
Step 6 Add supporting elements
This step is where you add the other modalities to the animated character and make the scene ready for the next step. What those are depends on the practice: further performers, music, a surrounding environment, costume and other objects.
What we did
We assembled the scene in Unity, the platform we were already working in, and everything below was done there apart from the music. What we added:
- A composition of several dancers, rather than the single figure the earlier steps produced.
- Music, generated from the direction the experts gave us. We generated it with Suno, then mixed and mastered it in Ableton Live.
- Fine tuning the captured dance animation, so that it fitted the music and the composition.
- A place: we used MultiSet AI to map the dance onto the Hadrianic nymphaeum at Sagalassos.
The composed scene, with the performers arranged and the audio in place. Tools
This step has no tool list. The composition is built in whatever platform you are already working in, and beyond that the tools depend entirely on what you are adding. What we used on the prototype is in What we did above.
-
Step 7 Compose for the medium
This is the final step: preparing the assembled experience for publishing to its target XR medium. Which platform you use depends on the medium you are publishing to. It can overlap with the earlier steps, and they can merge, but we keep publishing-readiness separate.
What we did
We prepared the prototype for publishing in Unity, the platform we had been building in, and published it to two media.
The first is a mobile AR app, installed on a phone and opened at the site. We created a location specific mobile AR experience, showing the dance in Sagalassos.
The second is a mixed reality experience for the Meta Quest 3 headset, showing the same dance. It is designed to be used anywhere.
The mobile AR app, running on a phone at the site. The Quest 3 experience shows the same dance. Platforms
These are the platforms we see used most often. They are not the only options, and new ones appear regularly. For web-based delivery, use 8th Wall or ZapWorks. For app-based delivery, Unity is usually the better choice.
Which XR media each platform can publish to
Platform Web AR Mobile AR AR headset VR headset Installation Unity We used this No Yes Yes Yes Yes Unreal Engine No Yes Yes Yes Yes 8th Wall Yes Yes Yes Yes No ZapWorks (Zappar) Yes Yes Yes Yes No Know another tool for this step? Suggest a tool for step 7: Compose for the medium